Aichi B7A
Aichi B7A “Ryūsei” – The Carrier-Borne Torpedo and Dive Bomber
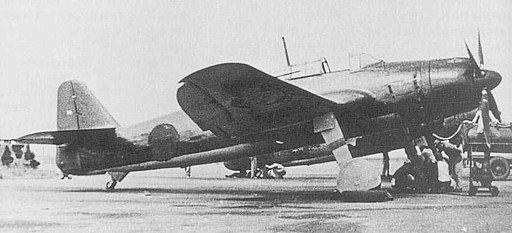
The Aichi B7A, known by its Allied reporting name “Grace” and often referred to as “Ryūsei” (流星, meaning “Shooting Star”), represents one of the most ambitious attempts by the Imperial Japanese Navy to field a versatile carrier-based attack aircraft. Designed to fulfill both torpedo bombing and dive bombing roles, the B7A was conceived to replace aging platforms and to take advantage of the larger flight decks and elevators offered by the new generation of Japanese carriers. Although produced in limited numbers and arriving late in the war, the B7A stands out as a noteworthy blend of innovation, structural ingenuity, and the shifting demands of maritime warfare during World War II .
Design and Development
Origins and Strategic Rationale
In 1941, as the Imperial Japanese Navy sought to modernize its carrier-based attack fleet, a pressing need emerged for an aircraft that could operate as both a torpedo bomber and a dive bomber. The existing Nakajima B6N Tenzan and Yokosuka D4Y Suisei were proving inadequate for the evolving tactical environment. In response, Aichi Kokuki initiated the design project—originally designated AM-23—to produce an aircraft that could not only cope with heavier ordnance loads but also operate from the expanded decks of the new Taihō-class carriers. Chief Engineer Toshio Ozaki led the design team, opting for a mid-wing layout that accommodated an internal bomb bay while providing sufficient clearance for a large, four-bladed propeller .
Innovative Aerodynamic and Structural Features
One of the most distinctive aspects of the B7A’s design is its inverted gull wing. This choice allowed for the shortening of the main landing gear—a crucial consideration for carrier operations—while ensuring that a 3.5-meter-diameter propeller had ample clearance. The wing was further refined with extendable ailerons capable of deflecting up to ten degrees, enabling them to serve as auxiliary flaps during dive bombing. Additionally, dive brakes were installed beneath the wing just outboard of the fuselage to help control the aircraft’s speed and trajectory during steep dives. For storage on carriers with limited deck space, the outer wing panels were designed to fold upwards hydraulically, reducing the overall wingspan from 14.4 meters (fully deployed) to approximately 7.9 meters .
Technical Specifications
Dimensions and Airframe
The Aichi B7A was tailored for the confined and challenging environment of carrier operations. Its dimensions and layout reflect a careful balance between aerodynamic performance and payload capacity.
- Length: Approximately 11.49 meters
- Wingspan: 14.40 meters when fully extended; reduced to around 7.9 meters when folded for carrier stowage
- Height: 4.07 meters
- Wing Configuration: Inverted gull wing with extendable ailerons and integrated dive brakes
- Airframe: Constructed primarily from light alloys with key stress points reinforced to withstand the high g-forces of dive bombing maneuvers
These features allowed the B7A to maintain stability during high-speed dives and rapid pull-outs while ensuring that it could be efficiently stored and handled aboard the larger, modernized carriers of the Imperial Japanese Navy .
Powerplant and Performance
The propulsion system of the B7A was a critical factor in achieving its ambitious design goals. The aircraft was designed around the Nakajima NK9C Homare 12 radial engine:
- Engine: Nakajima NK9C Homare 12
- Configuration: 18-cylinder, two-row air-cooled radial engine
- Power Output: Approximately 1,360 kW (1,825 hp)
- Alternate Configurations: There was one production variant (B7A2) outfitted with a 1,491 kW (2,000 hp) version of the Homare; plans were also advanced for a further upgraded variant (designated B7A3 Ryūsei Kai) to use a Mitsubishi MK9 radial engine, although this version never reached production.
Performance-wise, the B7A was one of the faster and more powerful naval aircraft of its time:
- Maximum Speed: About 352 mph (565 km/h)
- Range: Approximately 1,888 kilometers, offering a respectable operational radius for carrier-based missions
- Operational Role: Designed for high-speed attack runs, its speed and acceleration were essential for both torpedo delivery and precision in dive bombing
The robust engine and aerodynamic refinements granted the B7A a potent combination of speed, power, and reliability—a necessity for the demanding roles it was built to perform .
Armament and Payload
The versatility of the Aichi B7A derives in large part from its flexible armament configuration, which allowed it to switch between torpedo bombing and dive bombing missions:
- Internal Bomb Bay: The B7A featured an internal bomb bay with high-load-capability attachment points, allowing it to carry a substantial payload.
- Bomb Options: It could be armed with two 250 kg (550 lb) bombs, or alternatively, six 60 kg (132 lb) bombs.
- Torpedo Capability: Designed to carry one torpedo as an alternative armament configuration.
- Defensive Armament: In addition to its offensive payload, the aircraft was equipped with:
- Wing Cannons: Two forward-firing 20 mm cannons to engage enemy aircraft during attack runs.
- Rear Machine Gun: A single 7.92 mm machine gun mounted in a rear turret to provide defensive coverage against pursuing fighters.
This combination allowed the B7A to deliver a powerful blow to enemy naval vessels while maintaining a degree of self-defense during vulnerable attack profiles .
Operational Role and Production
Intended Operational Use
The B7A was conceived to operate from the new generation of Japanese carriers, particularly the Taihō and later the Shinano. Its dual-role design was envisioned to provide both the precision needed for dive bombing and the payload capacity for torpedo attacks. However, due to the increasing strain on Japan’s industrial production during the later stages of World War II and the deterioration of carrier operations as the war progressed, the B7A saw limited combat action. Its advanced design and structural innovations, though promising, came at a time when Japan’s operational situation had already drastically changed.
Production Numbers and Deployment
Production of the Aichi B7A was modest when compared with other carrier-based aircraft of the period:
- Total Units Built: 114 aircraft were produced.
- Production Locations: Manufacturing occurred at two primary sites:
- Funakata Factory, Aichi Kokuki in Nagoya (which built the majority of the units)
- 21st Naval Air Arsenal at Ōmura, which completed the remaining aircraft later in the war
Due to limited numbers and the challenging operational environment late in the conflict, the B7A never fully realized its potential as a game-changing weapon in the skies over the Pacific, yet it remains a striking example of wartime innovation and engineering ambition .
Legacy and Conclusion
The Aichi B7A “Ryūsei” stands as a testament to Japan’s innovative spirit during a time of extreme pressure and rapid technological development. Its design incorporated advanced features such as an internal bomb bay, inverted gull wing, and a powerful radial engine—each element demonstrating the Imperial Japanese Navy’s efforts to maximize combat effectiveness and operational versatility. Although the aircraft’s combat career was constrained by the timing of its introduction and the broader strategic challenges faced by Japan, the B7A remains an extraordinary example of a carrier-based torpedo and dive bomber engineered for the high-stakes arena of maritime warfare.
